HOHOKAM JEWELRY
When archaeologists analyze the prehistoric Hohokam of the Phoenix valley we truly see a high culture society that was highly organized and built monumental structures. In Hohokam archaeology we are finding more evidence of a ranking system with the possibility of elite leadership. Evidence for this claim is displayed through burial analysis and monumental architecture such as extensive irrigation canals and platform mounds. Without a structured hierarchy and leadership, Hohokam society would not have an organized labor force to maintain hundreds of miles of irrigation canals and multi story platform mounds. Additional evidence of hierarchy is displayed through restrictive access to the platform mounds at sites such as Meddler Point (ca. A.D. 1275 – 1325). Here, high ranking individuals were granted access to the platform while commoners or laborers were not. It is also my belief higher ranked officials in Hohokam were relied upon by lower ranked workers for protection. Moreover, the same officials were likely suppliers of foods such as corn, beans, and squash.
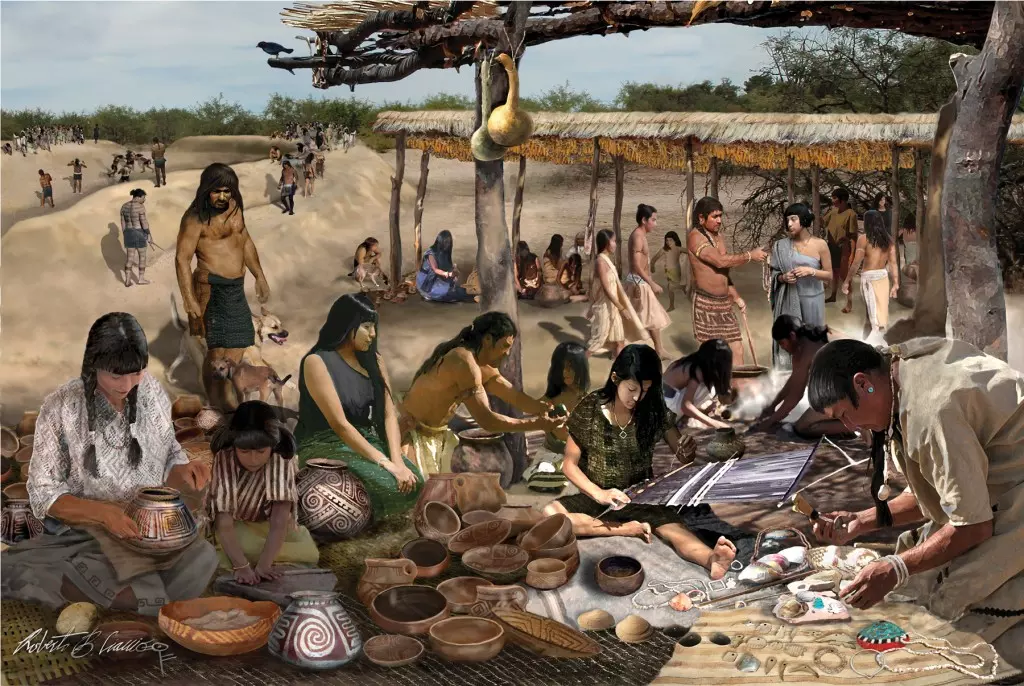
The story of Hohokam does not only revolve around higher class officials. In fact commoners consisted of skilled groups of people whom continue to impress scholars in Hohokam archaeology. While some groups were farmers and laborers, others were skilled specialists in ceramic production, flintknapping, stone carving, and shell work. Each specialized material remain we discover reaches far beyond the basic skill set. Rather, they resemble the complex material remains we find in Mesoamerica. In this article I will discuss the timeline of Hohokam shell jewelry and how to re-manufacture a Hohokam shell bracelet.
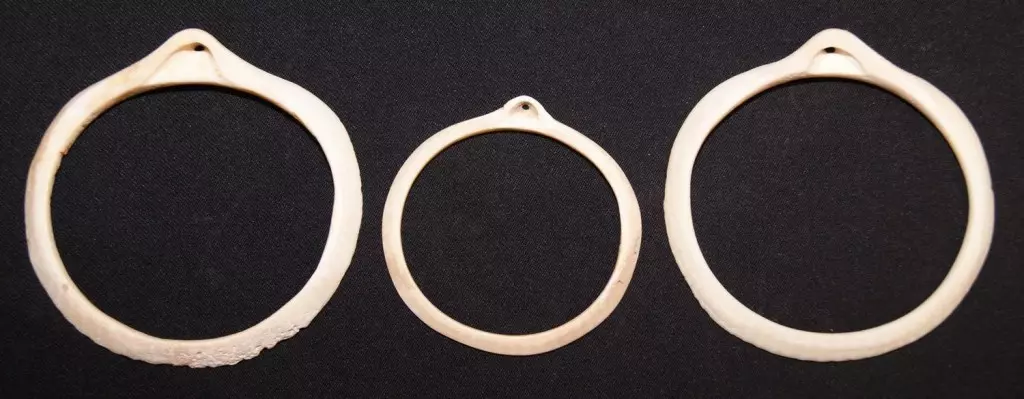
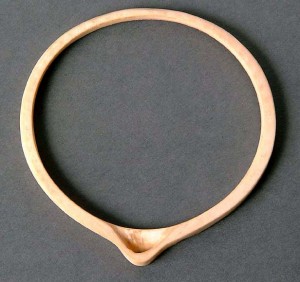
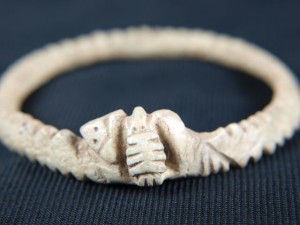
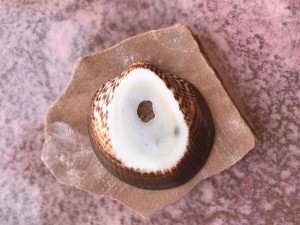
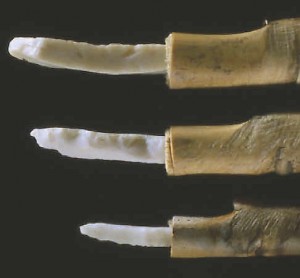
The use of shell ornaments has a long history in early Mesoamerica and in prehistoric Arizona. The vast majority of the shell used in the Hohokam region came from the Gulf of California and they obtained the raw pieces through direct trade. Shell crafting began in southern Arizona and northwest Mexico around 1200-850 B.C. These early forms were basic geometric shaped pendants and beads. During the Pioneer period (A.D 1-775) shell decorations shifted drastically towards more complex pieces such as Glycymeris bracelets. These bracelets quickly became popular among Hohokam people and continued throughout the Hohokam era. In the Colonial (775-950) and the Sedentary periods (950-1150), new types of shell depicting animal and human figures made a strong presence. Some of these life forms included birds, bracelets depicting snakes, coyotes, and raptor-like birds. In the Classic period, shell carvings became more abstract, artists stopped making representations of water birds, and new life forms such as lizards and frogs were very popular. In addition to decorative jewelry pieces, large conch shell trumpets were in the Hohokam millennium. In early eras trumpets were affiliated with important individuals, but in the Classic period trumpets were used in ritual at platform mound sites.
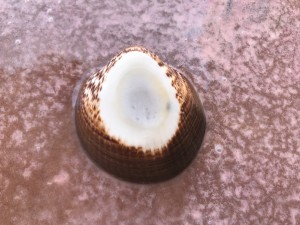
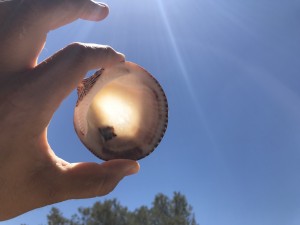
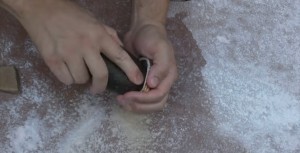
When manufacturing a Hohokam style shell bracelet one must acknowledge the difficulty of obtaining Glycymeris shells; especially large specimens. In addition, manufacturing such an item requires lots of work. These shells are very hard, and when grinding them on a stone slab they are comparable to grinding porcelain. So where can you find Glycymeris shells and what condition should they be in? Shells that exhibit heavy damage, and worm holes should be disregarded as they will cause problems as you work. The shells I use are freshly gathered from a reputable fisherman in Mexico whom only sells grade A quality materials.
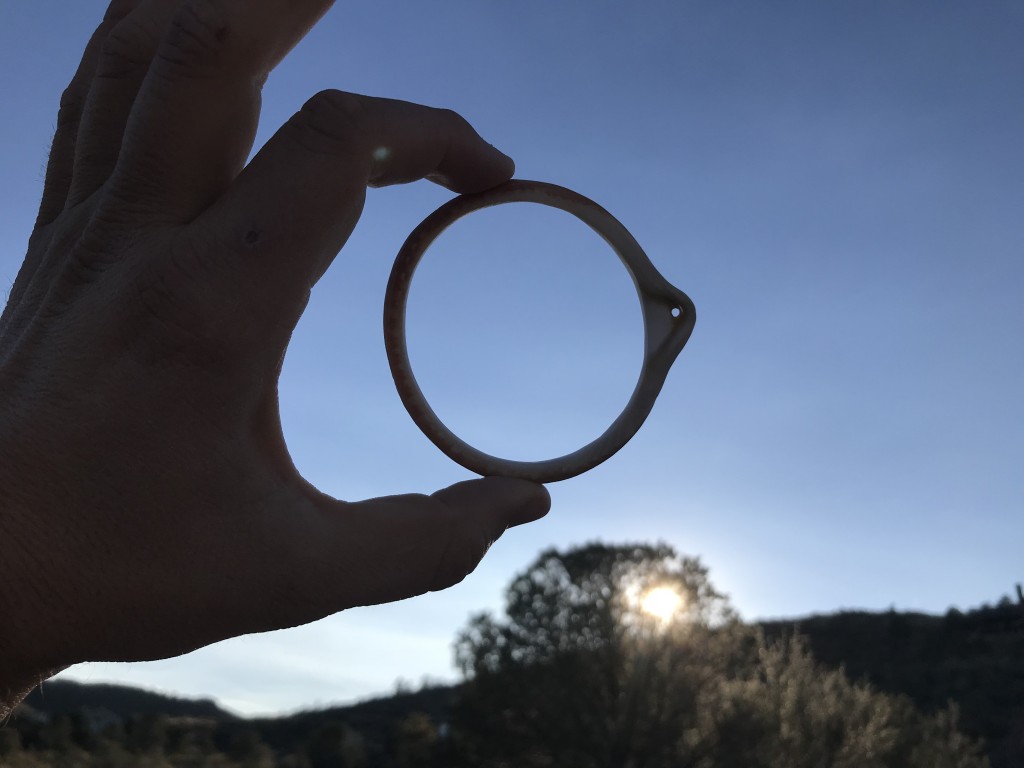
Once you have your shells, separate the clam and work one at a time. Begin by grinding the top bulged area on a large and heavily abrasive stone. As you grind, periodically hold the shell up to the sun to see how close you are to opening up a hole; this also allows you to focus on the thick areas that need to be worked. After a few hours of grinding you will notice the abrasive stone will become slick. One must either select a new stone, or peck into the existing stone to roughen up the surface once again. Archaeologically we have multiple examples of grinding stones that were pecked multiple times.
When you break through the shell and a hole appears, it is time to proceed to the next steps in manufacturing the bracelet. At this point you will use a small hammer stone and antler tine to chip around the edges of the open hole. It is very important to make sure the edge is thin before pecking out chunks of shell. If the edges are still thick you run the risk of fracturing the piece, thus breaking the shell. After chipping around the shell you will notice the edge is thick again. Repeat the same pattern of grinding the surface and pecking out chunks of thin shell until you are left with about .25 inches of material around the circumference.
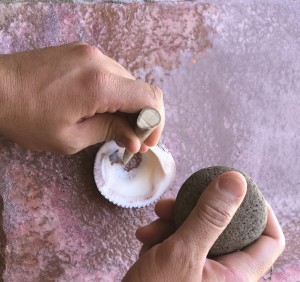
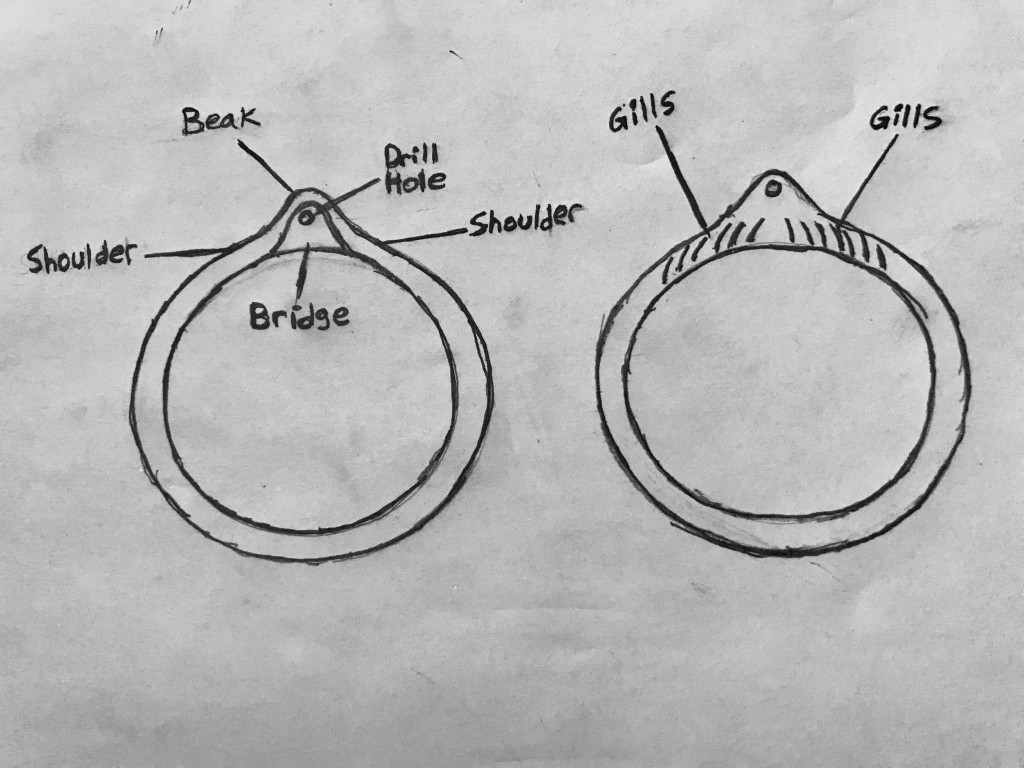
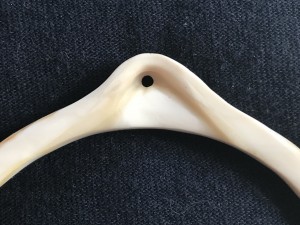
Depending on the size of shell, after three passes of pecking around the circumference, you will see major progress is being made and the shell is starting to open up. Now place the outer edge of the shell on your grinding slick and flatten the sharp edge. Next, use a larger round abrasive stone and insert it into the the opening. Begin to rotate the stone and grind the interior until you see a symmetrical round appearance. Proceed by grinding the interior bridge of the shell closer to the beak or nose of the piece. You will also notice the top of the bridge has a round top. Every Hohokam bracelet I have examined has this round top ground flat. When replicating these bracelets we should do the same. Simply use the sharp edge of an abrasive stone to grid the bridge flat. By this time the piece should start looking like a bracelet! Don’t get too excited though–there is still more work to be done.
At this point the interior of the bracelet should be round and symmetrical. These next steps require more tedious work and careful consideration. Moreover, the majority of your time spent will be concentrated into these last few stages of manufacturing. When examining the bracelet you will see the underside (where the gills are located) of the shell needs to be worked. Place the shell on the your abrasive stone and grind in a circular manner. Once the tip of the beak is flat stop grinding and flip the piece back over where the underside is facing towards the sky. Continue by grinding the beak flat. As you grind, constantly check the piece and make sure you are not removing too much material. When you notice the beak blends in with the rest of the bracelet and there are not any visible high spots, stop grinding and prepare to work the inside of the beak.
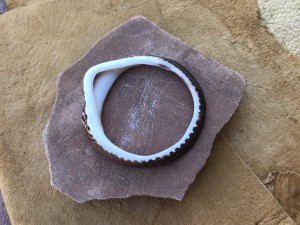
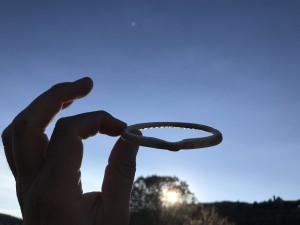
Hohokam shell bracelets have many different styles and variations. As your bracelet looks right now, it does match one of the styles we see archaeologically. However, some of the most beautiful examples are refined just a bit more. Indeed these refinements present a very elegant appearance. When examining the piece you will notice the shoulders next to the beak are protruding out and the wall of the beak is still quite thick. To refine these areas first break off a few flakes of sandstone and grind the sharp tips into a semi round profile. Next, by using the flat side of a sandstone flake, grind the shoulders until they blend into the rest of the bracelet. Continue by placing the round edge of the sandstone inside of the beak and rotate the flake in a half-circular motion. This will thin the the wall of the beak, just like we see in many original examples.
After about eight hours of work, your bracelet is almost complete! The final steps are to drill a hole through the tip of the beak and bake the bracelet to turn it white. When drilling a hole, it is critically important not to add a heavy amount of downward pressure. If too much pressure is applied, the beak will break. I can tell you, when this happens, frustration and disappointment is an overwhelming feeling! In other words, you feel as if eight hours of work was completely wasted. So what kind of drill should you use? Although a modern metal drill works just fine, I highly recommend using stone. Compared to metal, a micro stone drill is not as hard and sharp as metal, thus preventing the possibility of a broken bracelet. Once you have selected or made a few stone micro drills, mount them into straight wooden shafts, place the first drill into the center of the beak, and start drilling. Due to the density of the shell, you will use multiple drills.
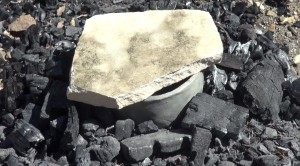
Almost all Hohokam shell bracelets are bleached white in color. Through examination and experimentation it is my belief that some bracelets were intentionally baked, while others have turned white from sun bleaching. Although we are not sure how the prehistoric Hohokam baked their shells, through experimentation I have figured out a method that works quite well. Dig a pit that measures about 3ft. by 3ft. and create a large sustainable fire. Place the bracelet inside of ceramic vessel and preheat it next to the fire. Once the fire has died down and you are left with a deep hot bed of coals, carefully place the vessel into the coals with a stone lid covering the top. Allow the coals to bake the shell and check the progress every five to ten minutes. When the shell turns white, remove the vessel from the coals and allow the bracelet and vessel to cool down for a few hours. Once cool to the touch, remove the bracelet from the vessel and wash it off with soap and water. Now your bracelet is complete!
The prehistoric Hohokam located in southern Arizona were truly an amazing group of people who were highly organized. When examining their material technologies we begin to understand how complex artisans and specialists were. Moreover, when attempting to re-manufacture their technologies such as shell bracelets we gain a sense of dedication. Indeed, the dedication Hohokam people exhibited was not merely focused on art. Rather their crafts and social structure were parts of a larger regional economy focused on community, connections to other neighboring people, religion, and power. So what happened to the Hohokam? This is one of the most debated topics in archaeology. Some believe massive flooding, disease, and the destruction of crops led to their abandonment. Others hypothesize a Salado presence created social tensions, warfare, and eventually abandonment. As for myself, I believe a Salado presence plays a significant role and explains the appearance of platform mounds and walled compound settlements. We might never know what led to their abandonment, but two things all Hohokam archaeologists agree upon are around A.D. 1450 we lose track of the Hohokam and there seems to have seen a significant event that pushed them away from the Phoenix area.
Hohokam archaeology is one of the most fascinating topics in archaeology today. Because of Cultural Resource Management (CRM) and non-profit organizations such as Archaeology Southwest, we have been quite successful in Preservation Archaeology. Without CRM and advocates in Preservation Archaeology the Hohokam might be a culture that is poorly understood in our modern society. Indeed, preservation is not just funded by federal grants and then dispersed to professional archaeologists. We also rely upon the general public to acknowledge, respect, and protect archaeological sites so our future generations can share the same experiences we to today. This collective effort among professionals and non-professionals is not only appreciated, but critical to our future studies and our ultimate goal of answering questions we simply can’t at this time.
Below is a step by step video series on how to make the Hohokam style bracelet.
Works cited:
Vokes, Arthur W. “Shell and the Hohokam.” Archaeology Southwest Phoenix Underground, 2017, pp. 31–32.